Live Data Configuration in Hyperview
By clicking the Options Menu, the Properties for Hyperview window will open. Click the Live Loop Setup Tab.
Contents
About the Live Loop Setup dialog
The Live Loop Setup dialog is the control center for managing and monitoring your live data settings. This is where you can see what CIUMon data servers Hyperview is connected to and whether there are any connection issues. Although the current version of Hyperview automatically routes data requests to the best placed CIUMon, it is also possible to force requests for particular loops or PCUs to be sent to a specified CIUMon. If a serial port module is available for a particular PCU it will be used automatically for requests for that PCU.
In general, your live data configuration will be determined by your DBDOC administrator and built into your project file. If this configuration has not been defined in this way, or you wish to override it, you can create a custom live data configuration in this dialog which can include CIUMons of your choice, or force certain CIUMons to be "ignored" by Hyperview.
![]() Note: You can see an icon representing the status of your live data connections in the Live Data Status Bar.
Note: You can see an icon representing the status of your live data connections in the Live Data Status Bar.
Choosing a settings list
Live data configuration has changed somewhat in DBDOC version 10.4.
As before, settings can be built directly into the project file by your DBDOC administrator, but now it is possible to group the CIUMons into different lists based on what network context the the CIUMon is located in. For example, many sites have one or more CIUMons running on their DCS LAN which are accessible to Hyperviews on the DCS LAN, but not accessible to Hyperviews on the business LAN. Those sites might add a second settings list that included a CIUMon running in relay mode on the business LAN.
You can choose among project settings, custom local settings, and demo data.
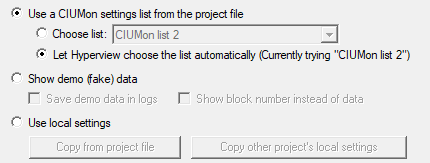
Use a CIUMon settings list from the project file
The settings lists built into the project file can be seen in the drop-down under Use a CIUMon settings list from the project file. Usually there will be only one list, but it is possible to build multiple lists into a project file. Your DBDOC administrator might do this in order to specify different CIUMons to be used in different network contexts.
Choose list
The first time Hyperview encounters server lists, it will try to choose the correct list for you (based on which CIUMons it can connect to), but you can override this choice manually by selecting a list here.
Let Hyperview choose the list automatically
If you want Hyperview to repeat the automatic list selection process, select this option. List autoselection will go on the background, indicated by the ![]() in the statusbar, along with information about what list is being tested.
in the statusbar, along with information about what list is being tested.
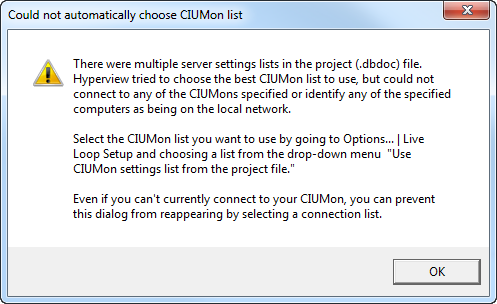
If Hyperview cannot choose a list successfully, you will see the following error dialog, along with ![]() in the statusbar. You can still choose a list manually with Choose list.
in the statusbar. You can still choose a list manually with Choose list.
Show demo (fake) data
Use this option to test the visual display of live data when your Hyperview is not hooked up to a CIUMon. You would never use this option under normal circumstances.
- Save demo data in logs: By default, demo data collected by the Watch Window is not saved to file. There would generally be no reason to save nonsense data, except for debugging purposes.
- Show block number instead of data: Check this box to show the block number for which data is being displayed, instead of the data itself. This is a debugging feature, but can be useful for verifying sources.
Use local settings
This choice allows you to define a local persistent CIUMon list. Use it if there are no settings built into the project file, or if you want to create different settings.
Copy from project file
This will copy the currently select settings list from the project settings to your local custom settings. If you want to create custom settings that are similar to the project settings, that's a good place to start.
Copy other project's local settings
You can select this option to copy local server settings from another project. If another project has correctly configured custom settings, use this function to load them.
This button appears if, and only if, there is at least one other project which has local settings that can be copied.
Understanding your current live data settings
The list of CIUMon servers that Hyperview is currently connected to (or trying to connect to) are displayed in CIUMon Settings. If you select a different server list as described above, a different set of servers will be displayed here. In general this list of servers will have been preconfigured at the build stage, and built into the project file. More than one list may have been built into the project file (typically to support fetching live data in different network contexts). In this case Hyperview will generally have selected the appropriate list automatically.
Each CIUMon server in the list is connected to either a CIU, a Serial Port Module, or another CIUMon server (in relay mode) which is ultimately connected to an actual CIU or SPM.
Unlike in previous versions of Hyperview, it is not necessary to specify in Hyperview which loop a CIUMon server is connected to. CIUMon reports its loop connection directly to Hyperview, and data requests are routed appropriately. The self-reported CIU location is shown in this dialog.
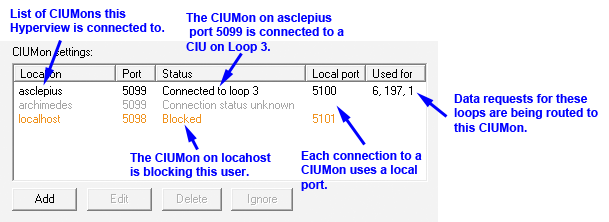
Location and Port
This is the computer and port that a CIUMon server is running on. Hyperview makes a connection to the CIUMon at that location. This is the only information about a CIUMon server that Hyperview needs to know.
Status
This column shows the current status of the CIUMon connection, whether it is connected, not connected, or blocked. If Hyperview is connected to a version 10.4 or later CIUMon, CIUMon will self-report which loop it is connected to, and that information is displayed here. Similarly, if the CIUMon is connected to an SPM to talk to a specific Loop and PCU, the PCU number will be shown here.
![]() Note: If Hyperview is connecting to an older CIUMon (pre 10.4), that CIUMon will not self-report its CIU location. In that case, the CIU location information can be provided manually via Routing Preferences (see below). When CIUMon settings are converted to version 10.4, routing preferences are automatically created for unusual cases, and you can also create them manually if needed. This should rarely be necessary.
Note: If Hyperview is connecting to an older CIUMon (pre 10.4), that CIUMon will not self-report its CIU location. In that case, the CIU location information can be provided manually via Routing Preferences (see below). When CIUMon settings are converted to version 10.4, routing preferences are automatically created for unusual cases, and you can also create them manually if needed. This should rarely be necessary.
Local port
This column indicates which local port on the Hyperview computer is being used to make the connection with the CIUMon server. Normally it is chosen automatically from the default port range, but it can be specified when a connection is defined, or a non-default port-range can be specified.
Used for
This column shows which loops are having their data fetched via that CIUmon. For example, if "3" is in this column, it means that data requests for Loop 3 are going to that particular CIUMon server.
Adding or modifying live data connections
Adding a connection
To add a new live data connection to a CIUMon server, press Add beneath the server list. The Add CIUMon dialog will appear. Specify the location of the CIUMon server Hyperview needs to connect to.
![]() Note: You can only add, edit, and delete servers that are part of a Use local settings server list. You can't change a server list that is built into the project file.
Note: You can only add, edit, and delete servers that are part of a Use local settings server list. You can't change a server list that is built into the project file.
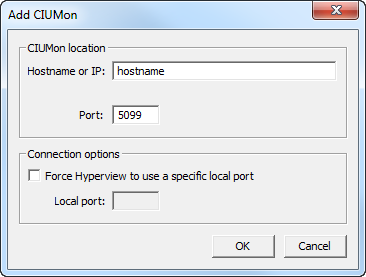
Hostname or IP
Specify the name (or IP number) the of the computer on which the CIUMon server you wish to connect to is running.
![]() Note: To indicate that the desired CIUMon is running on the local machine, use 127.0.0.1. Generally localhost will work as well, but this depends on your hosts file being configured correctly.
Note: To indicate that the desired CIUMon is running on the local machine, use 127.0.0.1. Generally localhost will work as well, but this depends on your hosts file being configured correctly.
Port
Specify the port that the CIUMon server is listening on. By default this is 5099, but if a CIUMon server on your system has been configured to listen on a different port, you must specify that port here.
Force Hyperview to use a specific local port
Allows you to specify which port will be used locally for communications with the CIUMon server. It is usual to leave this blank, and allow it to be selected automatically from the default port range (or specified port range), but under some circumstances it may need to be set explicitly.
Local port
If you are forcing Hyperview to use a specific local port by checking Force Hyperview to use a specific local port, you must specify the port number here. You might do this if your Hyperview can only use one specific port through your firewall.
Editing a connection
To edit an existing live data connection, select the connection in the Custom CIUMon settings list and press Edit. The Edit CIUmon dialog will appear. Make the changes needed and press OK.
Deleting a connection
To delete an existing live data connection, select the connection in the Custom CIUMon settings list and press Delete.
Ignoring a connection
To "ignore" an existing live data connection, select the connection in the Custom CIUMon settings list and press Ignore. Functionally this is identical to deleting the connection. When routing data requests, Hyperview will act as though that connection did not exist. However, it is temporary, because an ignored connection can be unignored and reinstated. If for some reason you want to force Hyperview to never send requests to a particular server, you can "ignore" it.
Specifying a non-default local port range
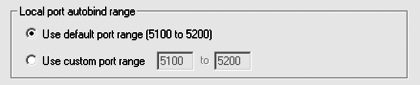
By default, Hyperview will assign a local port to a CIUMon connect automatically, choosing an available port from within the default port range. Unless you require specific port behavior, for example due to firewall constraints, it is best to stick with this default.
To specify a custom local port range, check Use custom port range and then specify the range.
![]() Note: You can only specify a custom port range for a Use local settings server list.
Note: You can only specify a custom port range for a Use local settings server list.
Adding routing preferences
Normally data requests are routing to appropriate servers automatically.
In the event that you want to specify that requests for a particular loop or loop-pcu combination should be routed to a particular server, click Edit routing preferences to open the Routing Preferences dialog.
![]() Note: If Hyperview is connected to a pre-10.4 CIUMon, the CIUMon will not report the location of the CIU it is connected to. Use a routing preference to specify this location if needed. The CIUMon will otherwise be assume to be connected to a CIU on Loop 1.
Note: If Hyperview is connected to a pre-10.4 CIUMon, the CIUMon will not report the location of the CIU it is connected to. Use a routing preference to specify this location if needed. The CIUMon will otherwise be assume to be connected to a CIU on Loop 1.
To add a routing preference, click Add to open the Add preferences dialog.
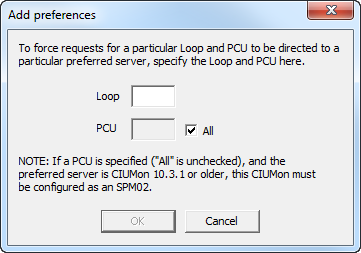
Specify the loop (and PCU, if applicable) you wish to make a routing preference for. When you click OK, the Set preferences dialog opens.
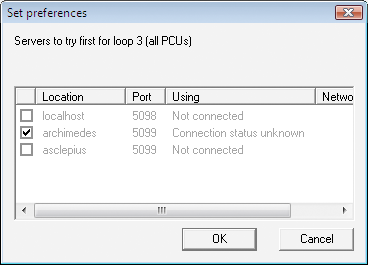
Choose the CIUMon server to which data requests for that loop-PCU should be routed.
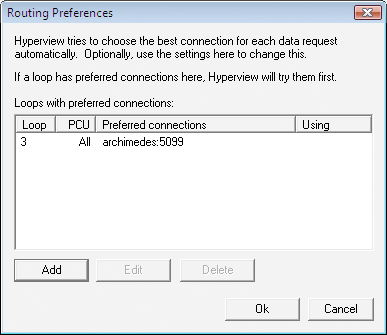
You can also edit and delete existing routing preferences.
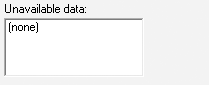
If data cannot be fetched for a particular loop or PCU, the loop and PCU are displayed here. If live data monitoring is turned on, but there is no CIUMon connection established, there will be items in this box. This could also happen if the only CIUMon available is connected to a serial port module on a certain PCU, and data is being requested for a different PCU.
See also
- About live loop annotations
- About the Error Browser
- About the Watch Window
- Adding a live loop annotation to the watch window
- Changing the appearance of live loop annotations
- Copying live loop annotations
- Creating live loop annotations
- Deleting live loop annotations
- Determining signal quality from line color
- Displaying live data directly on documents
- Displaying live data for all inputs and outputs on a document in Slow Mode
- Displaying periodically updated live data for all inputs and outputs on a document
- Editing live loop annotations
- Enabling fetching and display of live spec values
- Finding a live loop annotation if you forget which document it is on
- Importing live loop annotations
- Interpreting text and symbols on live loop annotations
- Live Data Options For This Block dialog
- Live data in Hyperview
- Managing live loop and text annotations in the Annotation Manager
- Monitoring live data related bandwidth, memory, disk usage and connection status
- Moving a live loop annotation to a different document
- Positioning live loop annotations
- Showing digital logic state labels for live data on documents
DBDOC ©1996 - 2025 G. Michaels Consulting Ltd., all rights reserved. All other trademarks and registered trademarks are the property of their respective holders. Website source largely available under the terms of the AGPLv3.