Exporting a single project
On the Tools menu, click Export and then Export Project.
This option allows you to export the current project so it can be imported into another installation of BuildPlus, for example on another computer.
A BuildPlus import file (.bpi) is created for the current project. The import file will be named <project name>.bpi and it will be created in the project's working folder.
This works best if the search paths used when creating the project were in UNC form (e.g. \\datacomputer\sharedfolder), so that the other installation will be able to find the files, even if you import the project on another computer. (A message will appear explaining this the first time you export a project.)
To import the project, see Importing a project
Moving projects to a new location or a different computer
To move all the projects in an existing BuildRoot to a new computer or a new location on the current computer,
- On the Tools menu, select Export and Create Export BuildRoot file.... Select List all projects in the BuildRoot for export and click Export. You should see a message box that the export file has been successfully created in the BuildRoot directory; this will be a filed named BuildRootImport.bri. (In case of computer failure where the Export function cannot be used, there is a recent automatically-generated file
BuildRootImport_Full.brithat can be imported in step 2.) - Copy your BuildRoot directory to the new location. Ensure the
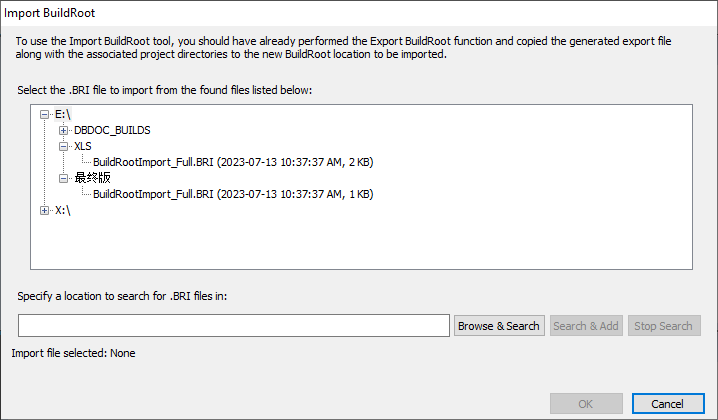
BuildRootImport.briandBuildRootOptions.nodfiles are included on the same level as the project folders. (If theBuildRootOptions.nodfile is not included, BuildRoot options will revert to default settings.) - In BuildPlus on the Tools menu, select Import and Import BuildRoot.... BuildPlus will start searching for .bri files, or you may stop the search and browse to the location of the BuildRoot that you want to import (or type or paste it directly in the edit box). Choose the appropriate .bri file and click OK to initiate the Import.

To move only some of the projects in the BuildRoot to a new computer or a new location on the current computer,
- On the Tools menu, select Export and Create Export BuildRoot file.... Choose to Select projects in BuildRoot for export, and select the projects you wish to move.
- Copy the
BuildRootImport.brigenerated in the BuildRoot folder and the selected project folders (plus theBuildRootOptions.nodfile, if you want your existing BuildRoot options) to the new location. - In the new location, start BuildPlus and on the Tools menu, select Import and Import BuildRoot.... BuildPlus will start searching for .bri files, or you may stop the search and browse to the moved BuildRoot that you want to import (or type or paste it directly in the edit box). Choose the appropriate .bri file and click OK to initiate the Import.
To move some projects and merge them into an existing BuildRoot,
- Choose to export all or some of the projects (from BuildRoot1) as described above.
- Copy the
BuildRootImport.brifile and the selected projects to the already existing BuildRoot2. If you choose to copy over theBuildRootOptions.nodit will overwrite the options previously specified for BuildRoot2. - Go to the Import BuildRoot tool and point it at the existing BuildRoot2 and click OK.
Note that any annotations and bookmarks associated with the moved projects will not be moved by these steps. To include them, either find the relevant user data file location and copy them to the corresponding location on the new computer, or import user data files from within the Hyperview browser.
If planning to replicate projects on a different computer or to save project settings in case of computer issues, it is possible to copy project .bpi files to back-up location.
See also
- Creating a new project or opening an existing project
- Opening a recent project
- Deleting a project
- Cleaning up temporary/intermediate files
- Importing a project
- Renaming a project
- Moving a project
- Cloning a project
- Changing Project Options
- Creating Project Settings Archive
- Recover Projects
- Copying project .bpi files to back-up location