Opening Wizard
On the Build menu, click Project Wizard, or click the ![]() button on the toolbar.
button on the toolbar.
(To open Wizard directly without doing the file processing and possible new Decomposer and other database processing, for instance to add new files to the project and complete the build at another time, it's also possible to use the Run Wizard for Configuration tool.)
This opens the Project Wizard so that you can review, add or change which files are included in your project.
For a new project, the Wizard is only accessible after the project name and databases have been selected in the System File Specifications dialog. Some selections may be made automatically based on Database types already chosen.
The Wizard only needs to be run once unless file selections need to be changed.
At any time, contextual help can be obtained by clicking on the ? box in the top right corner of the dialog box, and then clicking on the subject you are wondering about.
Note: as of DBDOC 10.7, it is possible to have pdf files built-in for display in Hyperview. If your project previously included externally-linked pdf files, a PDF Documents Detected dialog may appear, allowing you to build-in any or all of your folders of pdf files. It is best to avoid building the same pdf files as built-in and externally linked and as of DBDOC 11.4 this is no longer allowed. These selections can also be modified when rebuilding from Wizard.
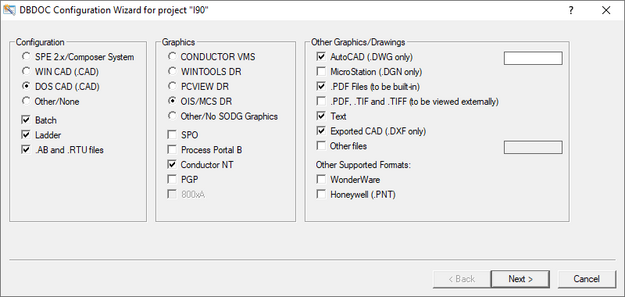
Specifying types of configuration, graphics and other files
- Choose one configuration type with a radio button, or choose Other/None. Select other types of configuration documents — Batch (.b90), Ladder (.lad) or .AB and .RTU files — as appropriate. (If WinCAD configuration is selected, then Wizard looks for CAD sheets with the same prefix as the MHD name.)
- Choose one type of SODG graphics with a radio button, or choose Other/No SODG Graphics. Specify SPO, Process Portal B and/or Conductor NT graphics as appropriate. 800xA graphics are specified in the initial System File Specifications dialog and, although the checkbox will be grayed out, it should show whether they are being built in or not.
- .jpg, .gif and .png images can be included for SPO graphics just after the file paths for the graphics are chosen
- If your system includes more than one type of SODG graphics, then after the Wizard, choose to Run Project Options in order to Categorize SODG graphics.
- Specify other file types to be included in the build by checking appropriate checkboxes.
- If you have scanned a sheet into AutoCAD sheet format and added tag names, it can be built in
- AutoCAD or equivalent files saved with extension .dxf can be built in by selecting Exported CAD (.DXF only)
- Bitmaps included by AutoCAD files are automatically built in
- C-programs with a .txt extension can be included by selecting Text
- Text files generated by DBDOC in a previous build can also be included in the build by first copying them to a different location where they won't be affected by the next build (for example the project folder\EXPORTS folder) then in Wizard selecting Text and selecting project folder\EXPORTS. Examples of these files are: F(X)_Specs.txt, FCList.txt, Unused-unconfigured_tags.txt, Unused-Alarm_tags.txt, Unused_Tags.txt, Unused_symbols.txt
- .jpg, .png and .bmp images can be built in by selecting "Other files" and adding .png,.jpg,.bmp to the edit box
- As of DBDOC 11.6, external webpage links within S+ graphics, .txt files, or PDF files will be detected and can be opened from Hyperview
- If there are file types you wish to build in that aren't listed below, please contact GMCL.
- More information is available about Adding AutoCAD files with .PRO and other extensions.
Click Next to continue.
Identifying where Wizard should look for files
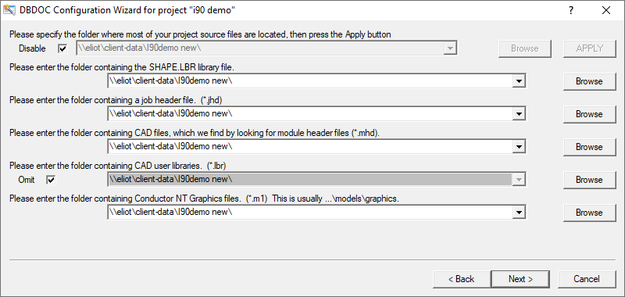
"Please specify the folder where most of your project source files are located, then press the Apply button"
- Normally, the Disable box should be checked
- But when most directory paths are empty, specifying one directory where most files are located, then pressing Apply fills in all directory search paths with that one choice as a starting point
Entering paths to files
- Enter the folder name in which the file(s) reside, and the wizard will find the files. (Using UNC naming conventions may be helpful if you later move to a new computer.)
- Once a path has been entered, the drop-down arrow can be used to select the same location for other files OR you can copy and paste from one box to another.
Browsing to choose paths
- Clicking on Browse will bring up the Windows "Browse for Folder" dialog, where a directory can be selected, or a folder path can be copied in. This choice will be appended to the end of any search paths already entered.
Adding more than one path
- More than one path will be searched if multiple paths are listed, separated with a "|" character
- Multiple paths can be quickly added by clicking the Browse button and selecting additional paths.
Red arrow alert
When you see a red arrow there may be invalid path information, which must be corrected to proceed.
(If files are located on a remote machine you can't access, it may be necesary to copy them to your local computer. If you do, don't change the directory structure as it helps BuildPlus make some automatic associations.)
If the Wizard can't find your batch,ladder, AutoCAD and/or text files, it may be helpful to specify loop, PCU and module (LPM). DBDOC BuildPlus configurator uses the following steps to find LPM for these files:
- Will use any internal loop, pcu, module it can find (generally only in batch and ladder files)
- Overridden with LPM from file name if it matches CAD Sheet naming convention
- Overridden with directory name - eg. 20406 Ref Def.B90 - This would be module 20406. This last option of modifying your directory name to include a LPM is the easiest way to apply special loop, pcu, module information to your set of files.
- When DECOMPOSER folders within the DBDOC_BUILDS directory are listed, they contain files created by DBDOC and should usually be left as the directory for Wizard to search.
- The CAD user libraries are usually omitted. For Composer projects, BuildPlus extracts a MACROS.LBR file. To specify a different user library, uncheck this Omit checkbox. This allows you to build with what you consider to be the master copy. (WinCAD systems often have multiple copies that must eventually be consolidated and united.)
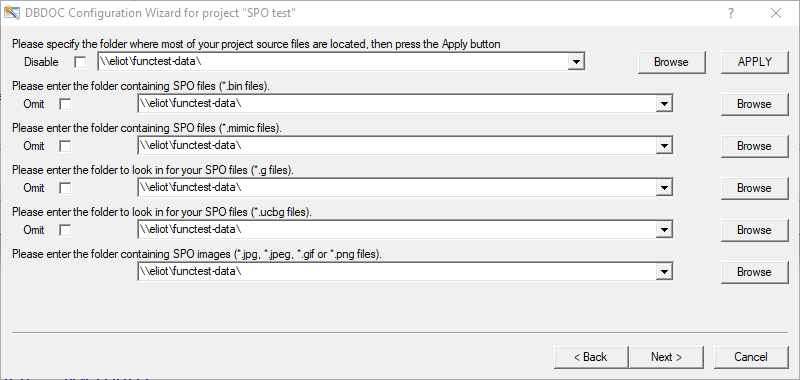
- For SPO (Symphony Plus/S+) and PGP graphics, .bin, .mimic, .g and/or .ucbg files can be selected separately or omitted by checking the boxes, and images can be displayed on the graphics when the graphics call for them. These images can be .jpg, .jpeg, .gif or .png. The location of the images can be specified in Wizard, though if they're in parallel \sdr or \udr folders, DBDOC will automatically find them as of 11.5.
After specifying the locations of files on each page, click Next to have Wizard find your files.
Confirming File Selections
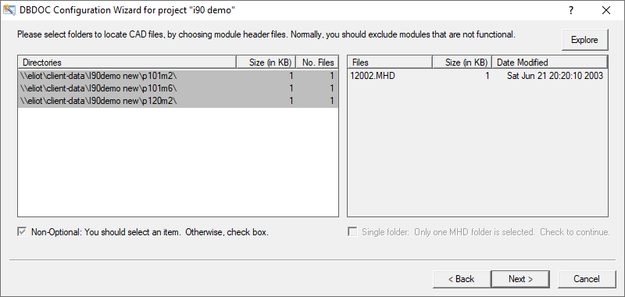
- The left panel lists folders identifed within the specified directory which contain each file type, with the currently selected folders highlighted. The right panel lists files contained in the last selected folder.
- To assist with choosing files, the lists can be sorted alphabetically or numerically by directory name, size or data modified by clicking on each heading.
- Using the CTRL or SHIFT key in combination with the mouse can make multiple file selections.
- The Explore button opens the specified directory to view the folders and files within.
- If the expected files aren't listed in the left panel, use Back to change where the Wizard should look for files, and ensure the Redo box is checked for a new Wizard search.
- Checkbox Non-Optional: You should select an item. Otherwise, check box can be checked to skip certain files or groups. This is not a recommended practice since your build results may not be valid.
- Single MHD: Only one MHD has been selected, check to continue should be checked if you wish to proceed with only one module in the build.
- To see which .ebp database file was used for extraction into each DECOMPOSER folder, move the mouse pointer over the name of the folder and a datatip will be displayed.
- For unit console graphics, to see which console is involved with each EBYxxx.TMP folder, move the mouse pointer over the name of the folder and a datatip will be displayed.
After selections have been made, click Finish to proceed with the build.
- The Run Project Options dialog may appear next, giving you an opportunity to change project options. To prevent this dialog from appearing, check Don't show me this again or on the Project Options page, uncheck the Launch Project Options after Wizard run box.

See also